Wednesday, December 31, 2014

DIY Wine Crate Coffee Table

It was love at first sight when I saw the wine crate coffee table on pinterest. The only problem was very few of the pins went into great detail on how to actually make the table yourself. My husband is pretty handy, though, so I showed him a picture and he set out to make it. 

We hunted for the crates at Lowes and Hobby Lobby, with no avail. As a last resort, we went into Michael's (on Black Friday) and it just so happened that they not only had the crates, but that we could get 40% off our entire purchase!  


Most of the pins I saw on pinterest only used 4 crates, but I wanted my coffee table to be a bit bigger than that, so we stood in the store and arranged the crates to see what we liked best. We decided that the 6 crate design would go best with our L-shaped couch. 

The crates are normally $13.99, so on that day we were able to get all 6 of them for around $50 (to say I was super excited, was an understatement). Michael's usually runs 40% off a single item coupons every other week, so you could technically purchase all of your crates for the same price, you would just have to do multiple transactions/different days.  

We let the crates collect dust in our garage for a few weeks until we finally decided to buckle down and start the process. My husband measured it all out and planned how he would construct the base. We ended up purchasing a sheet of 3/4 inch plywood ($30), 1x3 fascia board for the trim (2 pieces @ $5 a piece), and 4 swivel casters ($6 a piece) from Lowe's. We borrowed a hand sander, circular saw, and finishing nail gun from my brother and got to work. 

We originally purchased Minwax stain, but it went on like a tinted clear coat and I was not about to do 5+ coats, so we promptly returned that stain. This time, we took a small piece of the trim board with us to Lowe's so we could sample different brands/shades to find the best option. We settled on Rust-Oleum American Walnut colored stain ($8.50) and I'm happy to say that I only had to do one coat of the stain (it goes on super thick like paint, then you quickly wipe it off with a rag). One quart was more than enough for the entire project. 


We let them dry overnight then sealed them with Minwax Wipe-On Poly ($12).  Note: you might want to let the stain sit a little while longer than we did because the Wipe-On Poly did remove some of the color (which worked out in our favor because then it was a closer match to our tv stand). 


I would totally recommend buying a few bags of the rags (seen in the above photo). They are like $3 a bag at Lowe's and we used approximately 2.5 bags. If you want to save a few bucks, a cut-up t-shirt will work just as well--I wasn't able to convince my husband to sacrifice a shirt (or two) for the cause, so this was my only option. 

The back of the can says to let the sealant dry for 24 hours before light use, so we patiently waited the allotted time before nailing it all together. 

We then made an inset box for the middle of the table using leftover material (four sides and a top piece), and stained it to match. You would think this step would have been easy, but it was actually the biggest pain of the entire process! You could technically build the box into the unit itself, but we wanted the ability to remove it in the future (you never know when you will need a good hiding spot). In order to make this removable, we drilled two small holes into the top of the box--just large enough to use two small allen wrenches to pick it up.  


Altogether, this coffee table project cost us about $175. A little pricey if you're looking for a "cheap" DIY project, but if you are looking for a quality coffee table it's very affordable! It took us roughly 3 days to make (including the dry time). 

Update: We found the perfect baskets to fit inside the crates at Target for about $13 a piece: 


If you like this DIY Project, be sure to pin it!

Monday, August 25, 2014

30 Day Shred Results & Review


In preparation for my upcoming wedding, I decided to do the 30 Day Shred. 
I have heard lots about Jillian Michaels and this program, but have never done one of her workouts before...
Let me tell ya, it was rough!
Luckily, they did create the program to have examples of the advanced moves and modified moves.  I tried to always do the advanced moves, but used the modified moves when I just couldn't physically do it (like jump lunges--I'm definitely not coordinated enough for that). 
Overall, I really enjoyed felt that the workout was effective. 
Starting weight: 132.2
Thighs: 20 inches
Arms: 10.5 inches 
Bust: 32 inches
Waist: 28 inches
Hips: 31 inches
Before pictures on Left/After pictures on Right


Ending weight: 130.4 (-1.8 pounds)
Thighs: 20.5 inches (+ .5 inches)
Arms: 10.5 inches (no change)
Bust: 32 inches (no change)
Waist: 26 inches (-2 inches)
Hips: 39 inches (-2 inches)
Total weight loss: 1.8 pounds
Total inches lost: 3.5
I may not have amazing results like some people, and I definitely didn't lost "up to 20 pounds in 30 days" like the DVD case said; however, I can see a huge change in my muscle definition and, at the end of the day, your weight is just a number--it's how you feel about yourself that matters. 
I feel pretty dang proud of myself right now and I feel fit and ready for my wedding! 
(which, by the way, is on Friday!! eek)
I will definitely do the workout again--but probably not for a consecutive 30 days. 
I think it would be very effective to do each level once a week (3 days a week) and maybe cardio 2 days a week at the gym. 
Photobucket

Saturday, August 2, 2014

Seashell Bouquet Tutorial


I have always loved the idea of doing a non-traditional wedding bouquet that didn't include flowers, so once I decided on a beach wedding I knew I had to do a seashell bouquet!

I looked on etsy and considered buying one, but I wasn't completely in love with any of the options (or the hefty price tags), so I busted out my glue gun and got to work!


You won't really need a whole lot of supplies for this project. I made a trip to Michael's and Hobby Lobby to gather what I didn't already have: 


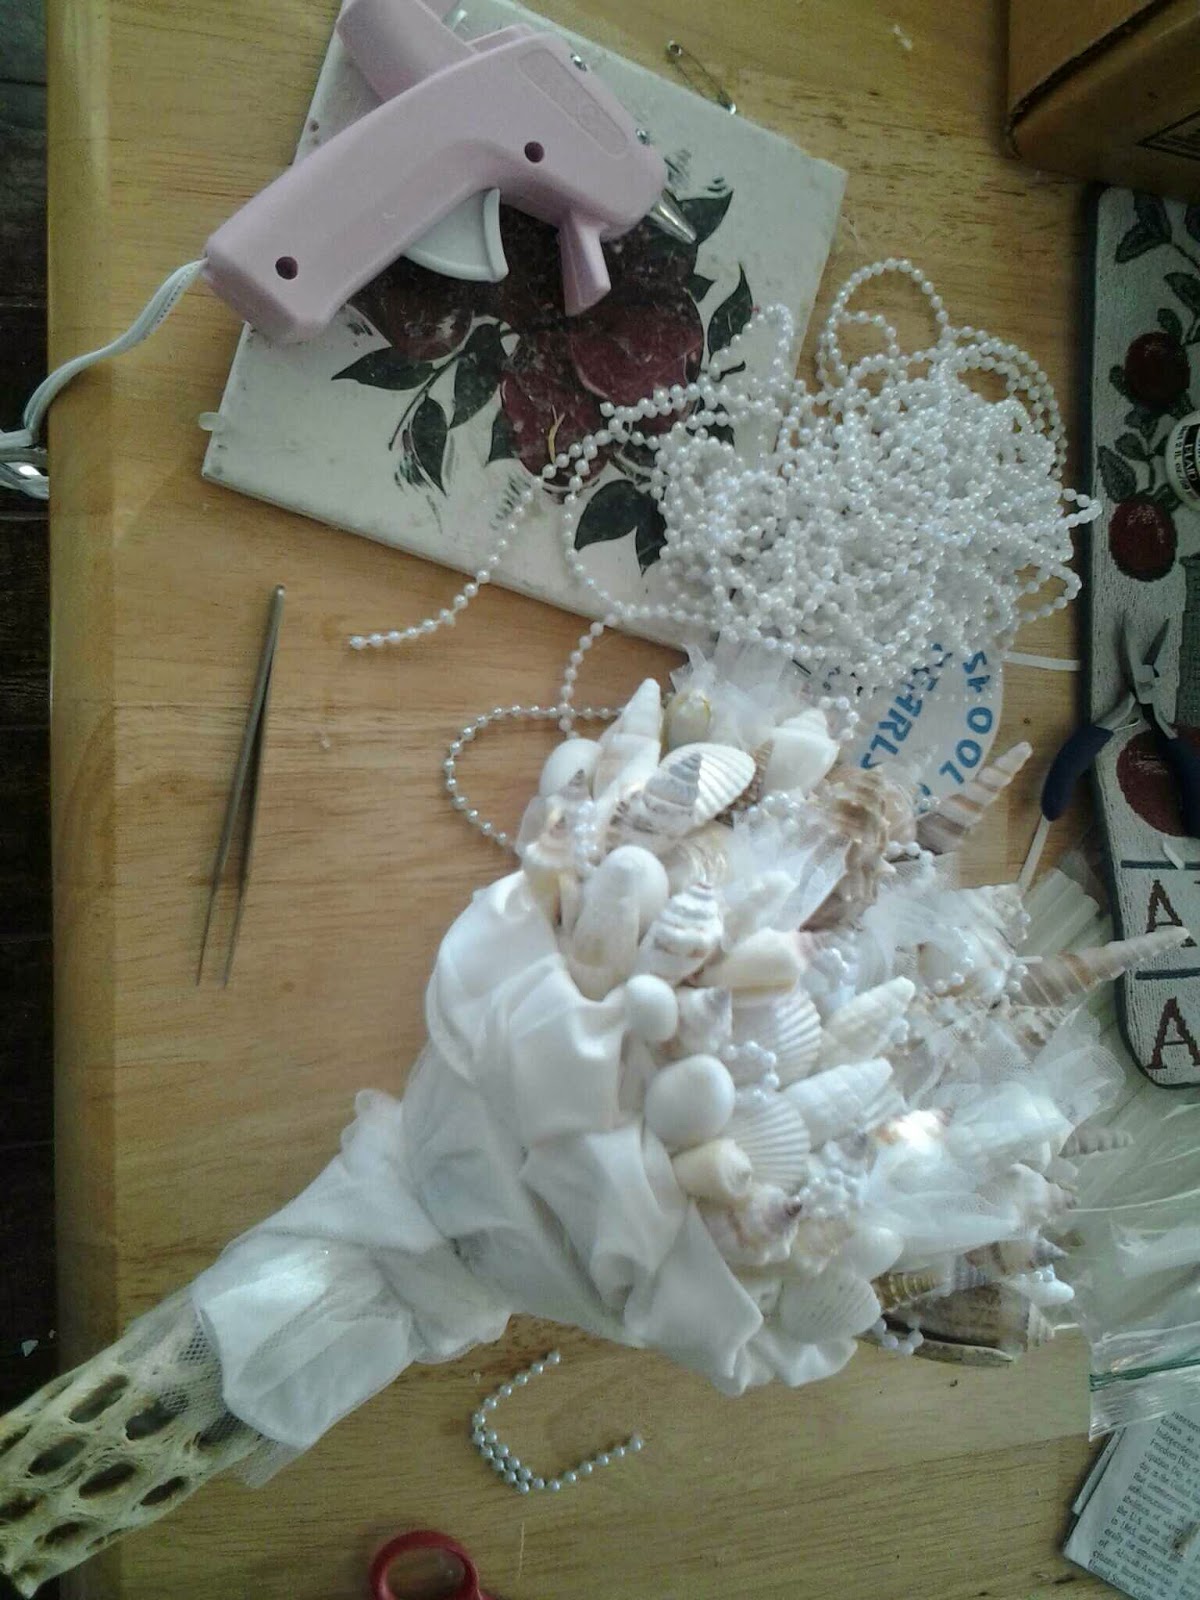
From left to right: I purchased the small cholla wood from Hobby Lobby, an old string of craft pearls, remnants of fabric and tulle, my handy glue gun and glue sticks, and floral pins (or wire, which I later discovered worked better). 

I ended up getting several different bags of shells so I could have a good variety, so the first step for me was to sort my shells into piles--this makes it easier when you are filling your bouquet. 

I then tested out my options for gluing the shells on--I knew I wanted height, so the original floral pins I purchased were not a good option for me, so I dug out some old wire and used it instead. 

I twisted the wire (for added strength), glued the wire to the inside of the shell, then dabbed some glue at the other end of the wire before inserting it into the foam. 


I continued filling my foam with shells until I was happy with it. 
I probably could have knocked this out in one day, but did it over the span of a few nights. 

As you can imagine, the bouquet is pretty heavy, so we were afraid that the plastic handle would not be durable enough to hold the weight. To alleviate this fear, we decided to bend thick wire along the length of the handle and tape it to the inside. I only had silver tape and didn't want to run to the store, so I just grabbed a can of spray paint and painted the silver tape white (while covering the top half with plastic bags of course)--I would recommend buying white tape, instead, if you do this step. 
(As you can see, I did this step and the next backwards, but I didn't want you to make the same mistake, so I switched the order in this tutorial)

Once I was happy with the arrangement, I figured out how I wanted to cover the base. I wanted my bouquet to be natural colors, so I knew I did not want colored material at the base. 
I decided to ask David's Bridal to save the material that they cut off my dress when they hemmed it--they thought it was a weird request, but I had a plan! 
I wrapped the remnants around the base of my bouquet, weaving it in between the wires (this can be done a variety of ways, so just play with your bouquet until it looks good). 

I then cut my cholla wood to the right angle for a snug fit and glued it on over the plastic base and continued to wrap the base with the remnants (this also worked to cover the glue). 

I decided my bouquet needed a little bling, so I cut small loops of craft pearls and used tweezers to hold them in place and glue them in between shells. I also cut a few small pieces of tulle and poked them in between some of the shells.

Overall, I am so happy with my custom made, non-traditional, seashell bouquet and I cannot wait to carry it down the aisle sand. 


Photobucket

Monday, July 14, 2014

Tiffany Blue & Gray


My new job is going great! It's taking me a little while to learn the ropes, but I'm so excited about what the future holds and I don't dread going into work anymore! 
An added perk is that I'm able to work 7-4, which took a little getting used to (earlier than I've gotten up in quite some time), but it is so convenient to get off at 4:00!
My official job title is Marketing & Business Development Manager, so I'm finally getting to put that MBA to good use!

Now on to some of the juicy information that I told you about a few weeks ago...
I have my wedding details all finalized. 
We will be getting married at Tides Folly Beach (just outside of Charleston) on August 29th.

source

I bought a Vera Bradley dress that fits so perfectly with the beach theme. 

I made my wedding bouquet out of seashells, and will likely post a tutorial soon. 

We are not having a bridal party since it will be an intimate, destination wedding; I realized that this, also, eliminated sooo much stress during planning! 

If you want to know more of the details, be sure to check out my wedding board!

Photobucket

Friday, June 27, 2014

Better Late Than Never


Hey everyone!

Yes, I'm still alive. 
Yes, I realize I haven't blogged in over a year. 
No, I have not forgotten about you--in fact, I read your blogs on a daily basis, I just fell off the "good blogger" bandwagon.

Let me explain...
At this time last year (and the year before that, in all reality), I was working at a job that literally sucked the life out of me. I barely did anything in my spare time, let alone blog. 
I missed my creative outlet, but that job made me an entirely different person--a person that I didn't like. 

A lot has happened since I last posted...

I spent 4th of July (2013) in San Diego

I jumped off of a building in Vegas
 

I went parasailing with my mom in Pensacola 

I threw my best friend a Bachelorette Party

I was Maid of Honor in her wedding

My mom built a house

I got engaged on New Year's Eve

We bought our wedding bands 

We had our first wedding shower

Oh yeah, and I quit my job! 
(Don't worry, I have a plan--I'll update you with details soon)


I missed you all so much and I'm so glad to be back!

Photobucket